Sunday, August 5, 2012

Orange Juice Bread

I've been sticking to my commitment to bake something for Jesson and his classmates every Monday this semester. The problem is, I keep forgetting to photograph what I've made! Last week was Individual Mint Chocolate Chip Cheesecakes, and before that was White Chocolate Lemon Truffles. I always have this hope that at the end of the day at least one of my creations will be left over and Jesson will bring it home so I can take pictures, but, alas, that hasn't happened yet. Which I guess I'll take as a compliment.

I try to alternate what I bake each week. I try not to do something super chocolatey every week, I think there should be some variety. In keeping with that theme this week, I thought about making some kind of bread. I thought of banana bread, but didn't have any overly ripe bananas. Then I thought about something with citrus (my absolute favorite). I started looking around online and found the perfect recipe from The Menu Mom for Orange Juice Bread. I skimmed the list of ingredients and realized I had everything I needed! Perfect!

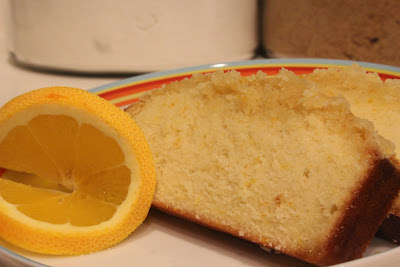
I did make two small additions that I think brought this bread from good to amazing. I added 1/2 teaspoon of vanilla bean paste and the zest of one orange and one lemon. I tried the batter before and after my additions. It was good before, but it was mind blowingly good after! Here is what I ended up with:


And the recipe (with my additions) if you want it:

Orange Juice Bread
  • 1/2 cup butter
  •  1 1/4 cup sugar
  • 2 eggs
  • 1 1/2 cup flour
  • 1/4 tsp. baking powder
  • 1/4 tsp. salt
  • 1/4 cup orange juice
  • 1/4 cup milk
  • 1/2 teaspoon vanilla bean paste (or vanilla extract)
  • zest of one orange
  • zest of one lemon
Preheat oven to 350.  Cream butter and sugar.  Beat and add eggs.  Combine flour, powder, and salt.  Mix orange juice with milk.  Alternate liquid with dry ingredients until a creamy mixture. Add vanilla bean paste and zest of lemon and orange and mix just until combined. Spray bottom of loaf pan lightly with oil.  Pour in batter and bake for 45 minutes or until center is set.  Let cool 10 minutes, then turn out onto cooling rack.

Glaze:
  • 1 Tbsp. lemon juice
  • 1 Tbsp. orange juice
  • 1/3 cup sugar
In sauce pan, cook until sugar is dissolved.  Brush over warm bread that has been removed from pan.

Tuesday, July 24, 2012

Before and After

The other day I uttered a phrase that most modern husbands are learning to fear, "I saw this thing on Pinterest...." For me, this typically means I saw some project that I now want to a) spend money on or b) have Jesson help me with. For him, the worst is when I want both! Luckily, this was one that I could do on my own and in the end it made my little OCD heart so happy! Here is the pin that caught my attention:


Whoa! Who wouldn't want the fridge on the right?! I read the blog post here and set out to get my own fridge in shape. I think I did pretty well. Below are my own "Before" and "After" pictures.


Much better! Now Jesson and I can keep our foods separate (we eat VERY differently) and it is much easier to find everything else. Hmmm, I wonder if this same strategy would work on the pantry? Time to go check Pinterest!

Saturday, July 7, 2012

White Coat Ceremony

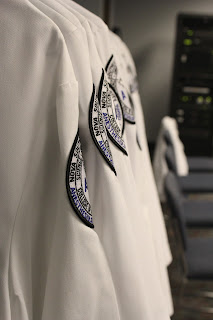
When a student enters the medical field they will often go through the White Coat Ceremony. This marks the beginning of their journey into the health professions. This past Friday was Jesson's White Coat Ceremony, and I got to present him with his white coat! Below are the pictures from the event:


Jesson and I both commented on the drive home that this ceremony made it feel even more real. 25 months, 16 days, 10 hours, and 13 more minutes to go! Just kidding, it's only 25 months 15 days to go at this point!

Happy 4th of July!

I'm still baking something for Jesson's class every week. This past week I decided to be patriotic and make something in honor of the 4th of July. I thought I might make something and decorate it in red, white, and blue. The more I thought about it, I really wanted whatever I made to have a very American taste as well as an American look. And what is more American than Apple Pie! But these are busy students, and they don't have the time or the facilities to cut into an apple pie in the middle of class, plus I'd have to send plates, forks, etc. Nope, not gonna work.....unless.....I put it into a portable form! Some quick searching on the internet and I had my answer: Apple Pie Filled Cupcakes with Caramel Icing! Genius! Essentially, I was going to make some cupcakes, hollow them out, fill them with apple pie filling, put the lids back on, and then frost them.

I read all these complicated recipes for how to make the cupcakes themselves. In the end, I saved myself the frustration and make a yellow cake mix according to the directions on the box. Then I added one extra egg and two teaspoons of cinnamon to turn them into cinnamon cupcakes. I divided them into two muffin tins so that I got 24 cupcakes. Then baked like normal. I let them cool completely and then hollowed them out. At that point, I took two cans of apple pie filling and pulsed them in my food processor a couple times. The apple chunks were WAY too big to fit into the cupcakes and needed to be broken down into little pieces. Then I put the lids back on and frosted them with caramel frosting. Below was the result:

 The red, white, and blue under the cupcake is actually a super cute wrapper that I got from JoAnn's. Each cupcake had their own little wrapper. Then they got packed up to go to school the next day:

From what I hear, they were a hit! There were none left at the end of the day. I've never made filled cupcakes before, but these were relatively easy and have got me thinking about what other flavors I can do!

Sunday, July 1, 2012

What's for dinner?

A few months ago when we went on vacation to Pompano Beach we stopped and ate at The Cheesecake Factory. I know, not very unique, but I was starving and it was close. I got a dish there called "Chicken Bellagio". My world has never been the same since. This is one of the most delicious chicken dishes I've ever had, and it seemed like such a simple concept. Here is their description of the dish: Crispy Coated Chicken Breast over Basil Pasta and Parmesan Cream Sauce Topped with Prosciutto and Arugula Salad. I have been craving this dish and decided that I would make my own version. I skipped the pasta because the chicken and arugula salad are filling enough, and Jesson isn't a big fan, so there was no point. Maybe someday. Anyway, this is what I ended up with:

I took a chicken breast and pounded it flat (actually Jesson did, but I directed him). Then I coated it with seasoned whole wheat breadcrumbs and fried it for about 3-4 minutes on each side until it was golden brown on each side. After I had fried the first side and flipped it over I put two thin pieces of prosciutto on the chicken to let it warm up a little bit. Once it was done I removed it from the pan and put it on a plate. I added a huge, heaping pile of arugula and drizzled it with olive oil and fresh lemon juice. To finish it off I added Parmesan cheese and salt and pepper. It was delicious! I don't think my chicken was as thin as The Cheesecake Factory one, but it was so good and so easy! We have already had it twice in one week now. For a side dish we had crispy parmesan bread, also easy and super yummy. Here is what it looks like:

These were store bought buns from Walmart, though our favorite is when we do this on sesame seed french bread from Publix. Set the oven to broil and then make the Parmesan mix. The Parmesan mix is 1/4 cup melted butter, 1/4 cup mayo, 1/4 cup shredded Parmesan, 1 Tb dried oregano, and salt and pepper. Mix that well and slather all over the bread/buns. Place under the broiler for 3-4 minutes until the cheese is brown and bubbly (like above). It is soooo good! I know the mayo sounds weird, but it adds this creamy element that wouldn't otherwise be there. I got this idea from Melissa D'Arabian on the Food Network. Here is her recipe in case you want to check it out: Crusty Parmesan Bread. She doesn't do oregano in hers but I like it because it adds a little color. You could leave it out if you wanted. She also does a little less mayo than I do. We've had this dinner twice so far this week. It's so easy but it looks and tastes so good!

Tuesday, June 26, 2012

Meet the Neighbors

We moved into this house almost a year ago and we instantly LOVED our new neighbors. They're not around all the time, they come and go, but they are always entertaining and they keep to themselves. Oh wait, here are some of the neighbors now:
Can you tell who they are? No? Ok, maybe this will help:
You've probably guessed by now. But just in case, here's one more:
I call this one: "Contemplative Cow". They live in the field across the street from us. This spring they all had calves and it was so cute watching them nap in groups and run around in the awkward way that they have (that cows never actually grow out of). The window in our office overlooks their field so the dogs love it when the cows are around. They will sit and stare out the window at them for hours. It's even more exciting when the donkeys are there as well.

We also have another set of neighbors that we love even more than the cows. Here are a few pictures of them:
The pictures are a little deceptive, up close they're about as tall as I am (that's 5'2" for those of you not in the know). I was right across the fence from them when I took these pictures. They didn't seem intimidated by me or the camera at all, just curious. They can get pretty rowdy sometimes and have a very distinct sound that we can hear even when we're in the house. They also like to hang out in the field across the street with the cows or in the field directly behind our back fence. Sometimes we see them walking down the street in the neighborhood. They pretty much do whatever they want and people leave them alone. They are almost always in pairs or threes, I've never seen one on it's own.

The last set of neighbors that we see a lot (but don't really know that well) have been around since the spring. They built their house right at the top of a light pole just outside the entrance to our neighborhood:

These guys are super cool. There is another huge nest just a few streets over. They are always sitting up in their nests, watching everything in the morning when I'm going to work and again in the evening when I'm coming home. We've seen a few of the babies. We'll be sad when they move on, but hopefully they'll be back again next year.

So now you've met the neighbors! Say hi if you see them when you stop by the house!

Sunday, June 24, 2012

Sweet Tooth - Salted Caramel Butter Bars

As mentioned in my post below, I love cooking. Especially sweet things. The problem is, then I eat those sweet things....all of them.....by myself. This is bad. What I have found is that other people like sweet things too! So to solve my dilemma of loving to cook, but not wanting to eat myself into Jabba the Hut, I have started cooking and baking for other people. Viola! Problem solved! Now that Jesson has started his new program, I have a whole new group of victims people to bake for! I have started making something for him to bring in every Monday, and they like it! I actually have requests from people (i.e something with peanut butter, chocolate, fruit, coconut, citrus, etc) This makes me so happy. Jesson isn't a big sweets person, so when I make things, he might have a few bites, but then he is done, and he almost NEVER requests anything. Having an entire group of people that not only like the treats I make, but actually get excited about what the next batch will be is too much fun!

This past week it was Salted Caramel Butter Bars. I found the recipe on Pinterest from Pip & Ebby. I followed the recipe exactly, but learned a few things along the way. First, when you bake the bottom crust, it is going to take closer to 30 minutes for the crust to get golden brown. Second, when you are microwaving the caramels, the first minute isn't going to do anything. You're going to have to do about 3-4 extra 30 second intervals (stirring between) to get the caramel really smooth. Third, don't bother starting on the microwave caramel mixture until you get the bottom crust out of the oven and cooling. That bottom crust has to sit for 15 minutes before you pour the caramel mixture over the top, so there's no point in finishing the caramel mixture and then letting it cool that long, it gets too thick. Past that the bars turned out amazing and everyone loved them! Here are a few pictures before I sent them in:


The Spice of Life - Pantry Redo

The saying goes "Variety is the spice of life". Yesterday, for me, the opposite was true. Uniformity was definitely the spice of life! Let me explain. I love to cook. Just about anything. I love taking random ingredients and combining them in a way that makes them taste amazing. With all of this cooking that I do I have accumulated a lot of ingredients. And by this I mean a lot of spices. Our current pantry is big enough to hold them all, but there were so many of them and they were all different sizes and in different packaging. The OCD in me did not appreciate this. Let me show you what I was dealing with:


Yes, they are on a few different levels, but I couldn't see anything. All the red tops looked the same, I had to pick up each bottle to see what it was and I could never find the little short bottles of stuff. I knew something had to change. Every time I opened my pantry I cringed a little. So I started looking for a solution. I came across this picture on Pinterest:

Oh the excitement I felt! Finally, a DIY way to get uniform spice containers! I clicked on the link and began reading, and shortly after, my heart sank a little. The beautiful bottles that the person had used were from Starbucks Frappuccino drinks. I don't drink coffee, at all. Add to that, the case of 4 drinks costs $6 each. That's $1.25 per bottle (not to mention I would just have to throw the contents down the drain). I did some quick math, I needed about 60 bottles, maybe a little more. That comes to......$75!! I couldn't justify that. I started thinking about how there must be someone around me that buys these drinks and throws the beautiful bottles away. So I posted an ad on Craigslist "I will pay you $0.50 for every bottle, that is like getting $2 off every pack you buy!" I thought I was so clever! Surely someone would love to have this deal! I patted myself on the back and began waiting for the emails to flood in fighting over who gets my $0.50 per bottle! One month later......there was no flooding......there wasn't even a trickle. No one responded to my ad!

Disappointed, but not discouraged, I moved on to phase 2. Surely there are other, attractive bottles on the internet, right? I started searching, I started reading forums and blog posts. I wore out the buttons on my calculator adding together cost plus shipping divided by the number of bottles. Then I came across a conversation on this random forum. Someone suggested using Mason Jars but in the 4 oz jelly size. WHAT?! Mason Jars come in a 4 oz jelly size?! Just like every other self respecting pinner out there, I LOVE Mason Jars! I started looking around online and sure enough, they exist, and at Walmart!! The price was perfect too, only $8 for a 12 pack! That came to $0.67 per bottle. Not quite as cheap as the $0.50 that I wanted to pay, but not too far off. The fact that I could go to Walmart that day and buy them, thus fulfilling my need for instant gratification, was even better! Within the hour I was at Walmart and buying five cases of these:

I also grabbed a RedBox movie to watch while I was making the individual little labels for the top of each jar. It was "We Bought a Zoo" if you must know. No, I do not recommend it. Ok, back on track. I brought them home and did an inventory of my spices. I needed to know what labels to make. Turns out I had 4 bottles of Cumin, 3 bottles of Cinnamon, and 2 bottles of too many other things to name. Time to consolidate! I made the labels, applied them to the top of the jars using ModPodge, and added my spices. As I threw away plastic bottles I could see my vision coming to life, and it was beautiful! In the end, this is what I had:


Holy cuteness! I am so excited! I can see all my spices (through the clear jar and also by the labeled lid). They are uniform, and they are stackable if necessary. I think they look great. The two different colors don't mean anything, I just wanted to have more than one color. This was a really easy project and I'm so glad I finally did it! I used 58 of the 60 jars, so I have two left over just in case I need some.
Thursday, June 21, 2012

Another New Chapter (aka the countdown begins!)

When Jesson and I first got married we had a plan. I was going to work full time, he was going to go to school. When he finished school, we would have kids. I would stop working and stay home with them and he would start working. It was a great plan, still is. What we have learned along the way is that instead of plans happening in a straight line, they usually take a few twists and turns. Sometimes a lot of twists and turns. Sometimes your plans look like this:

But that's ok. As long as you keep the goal in sight you will get there. That has been the case with us. At first, Jesson was going to go to Med School. Then we decided on Vet School. (there was a lot of other stuff in between, but I'll spare you the details). Finally, through all these twists and turns we (think) we have found the right road. A few weeks ago we began a new chapter in our lives when Jesson began a 27 month program at NOVA Southeastern University here in Tampa to become an Anesthesiologist Assistant. He will come out at the end with his Master's degree and will be able to work under the direction of an Anesthesiologist. So many things have come together to make this program work for us, from our living situation, to my job to the program itself. It almost seems like this program was tailor made for Jesson it fits him that well. It is going to be extremely challenging, but it's nothing he can't handle. During this time he is not working, so that has been a trial, but seeing the blessings that have poured our way to make this possible has been truly humbling.

So, finally, after 7 1/2 years, the final countdown has begun. There is light at the end of the tunnel and we have begun to make plans for AFTER school. I am typing this in a normal font, in black letters, but I am so excited about this I wish the letters could be in a crazy font and be in gold glitter. We have fought long and hard for this and are so excited to see it all coming together. A quick shout out to everyone that has stuck by us and encouraged us along the way, including, but not limited to: our parents on both sides, our siblings, our friends, and our extended family. You have no idea what the words of encouragement you have given us along the way have meant, thank you!